Gem Series ++ Project Automation 'n' Database Documentation Tools (Book Edition)
by Gerald Bauer, et al
- 1. quik - Quick Starter Template Script Wizard; The Missing Code Generator 'n' Project Scaffolder for Gems, Sinatra, Jekyll 'n' More
- 2. hoe - Build, Package and Publish Gems with Hoe; Use Build Scripts with Ready-to-Use Rake Tasks
- 3. schemadoc - Auto-generate your SQL database schema documentation for tables, columns, symbols A-Z, etc
- 4. annotate - Annotate Your ActiveRecord Models with Comments about Your Database Table Structure
- 5. erd - Generate entity-relationship diagrams (ERD) for your activerecord models
1. quik - Quick Starter Template Script Wizard; The Missing Code Generator 'n' Project Scaffolder for Gems, Sinatra, Jekyll 'n' More
The Missing Code Generator and Project Scaffolder for Gems, Sinatra, Jekyll & More
github: quikstart/quik, rubygems: quik, rdoc: quik ++ more: comments on reddit, please!
Q: How do you get started with creating a new gem?
- [A] From scratch ;-)
- [B] Using bundler with
$ bundle gem - [C] Using quik with
$ quik new gem - [D] Using hoe with
$ sow(incl. with hoe rake tasks gem) - [E] Other (Please Tell).
Q: How do you get started with creating a new sinatra app or service?
- [A] From scratch ;-)
- [B] Using padrino with
$ padrino g project - [C] Using quik with
$ quik new sinatra - [D] Other (Please Tell).
Q: How do you get started with creating a new jekyll theme?
- [A] From scratch ;-)
- [B] Using jekyll with
$ jekyll new-theme - [C] Using quik with
$ quik new jekyll - [D] Other (Please Tell).
One Quik Starter to rule them all?
Let’s welcome the quik library and command line tool.
The idea: Many starter templates / boilerplates are ready-to-fork GitHub repos. Why not turn GitHub repos into quik starter templates?! Let’s do it in 1-2-3 steps.
Step 1: Download Single-File Quik Starter (.ZIP) Archive
Did you know? You can download GitHub repos without git? That is, download a single-file archive (.ZIP) – gets (auto-)built by GitHub.
Example - gem-starter-template.zip:
lib/
  $filename$.rb
  $filename$/
    version.rb
test/
  helper.rb
  test_version.rb
.gitignore
HISTORY.md
Manifest.txt
README.md
Rakefile
(Source: quikstart/gem-starter-template)
Step 2: Parameterize Files - Use a Template Language
- [A] Use Embedded Ruby (ERB)
- [B] Use Liquid
- [C] Other (Please Tell).
Example - lib/linz/version.rb:
module Linz

  MAJOR = 0
  MINOR = 0
  PATCH = 1
  VERSION = [MAJOR,MINOR,PATCH].join('.')

  def self.version
    VERSION
  end

  def self.banner
    "linz/#{VERSION} on Ruby #{RUBY_VERSION} (#{RUBY_RELEASE_DATE}) [#{RUBY_PLATFORM}]"
  end

end  # module Linz
Let’s use a new (simpler) template language (e.g. $name$)!
Example - lib/$filename$/version.rb:
module $module$

  MAJOR = 0
  MINOR = 0
  PATCH = 1
  VERSION = [MAJOR,MINOR,PATCH].join('.')

  def self.version
    VERSION
  end

  def self.banner
    "$name$/#{VERSION} on Ruby #{RUBY_VERSION} (#{RUBY_RELEASE_DATE}) [#{RUBY_PLATFORM}]"
  end

end  # module $module$
(Source: quikstart/gem-starter-template/template/lib/$filename$/version.rb)
A New Meta Template Template Language. Why not ERB or Liquid?
- Simpler – works inside filenames too ;-) e.g.
lib/$filename$/version.rb - Shorter – less typing (plus: no worries about whitespace)
Most Important: “Orthogonal” to ERB and Liquid. Lets you parameterize ERB or Liquid templates too - no need for escaping or “raw” blocks etc.
module $module$     | module <%= module %>  | module   | module Linz
  ...               |  ...                  |   ...                |   ...
end                 | end                   | end                  | end
Step 3: What’s Missing? All together Now - Automate with a Script
Let’s use Ruby ;-) a with wizard mini language, that is, a domain-specific language (DSL).
Example - scripts/gem.rb:
say "Hello from the gem quick starter wizard script"

name  = ask "Name of the gem", "hola"

def make_module( name )
   ...
end

module_name = ask "Module name of the gem", make_module( name )


## use template repo e.g. github.com/quikstart/gem-starter-template

use "quikstart/gem-starter-template"

config do |c|
  c.name     = name
  c.filename = name     ## for now assume name is 1:1 used as filename
  c.module   = module_name

  c.date     = Time.new.strftime("%Y-%m-%d")  ## e.g. use like $date$  => 2015-08-27
end
(Source: quikstart/scripts/gem.rb)
Voila. That’s it.
Appendix: quik help - Quik Starter Commands
$ quik --help      # or
$ qk -h
Resulting in:
NAME
    qk/quik - ruby quick starter template script wizard .:. the missing code generator

SYNOPSIS
    quik [global options] command [command options] [arguments...]

VERSION
    0.3.0

GLOBAL OPTIONS
    --help            - Show this message
    --verbose         - (Debug) Show debug messages
    --version         - Display the program version

COMMANDS
    list, ls, l - List ruby quick starter scripts
    new, n      - Run ruby quick starter script

    help        - Shows a list of commands or help for one command
quik ls - List Quik Starter Wizards
Use:
$ quik list    # or
$ quik ls      # or
$ quik l       # or
$ qk l
Resulting in:
  1..gem        .:.  Gem Quick Starter Template
  2..gem-hoe    .:.  Gem Quick Starter Template (Hoe Classic Edition)
  3..sinatra    .:.  Sinatra Quick Starter Template
...
quik new - New Wizard Quik Start
To run a quick starter template wizard script to download and install (unzip/unpack) a template archive and configure the code ready-to-use. Try:
$ quik new gem    # or
$ quik n gem      # or
$ qk n gem
This will download the gem.rb wizard script
from the Scripts repo
and run through all steps e.g.:
Welcome, to the gem quick starter script.

Q: What's your gem's name? [hola]:   hello
Q: What's your gem's module? [Hola]: Hello

Thanks! Ready-to-go. Stand back.

  Downloading Gem Starter Template...
  Setting up Starter Template...
  ...
Done.
That’s it. Now the gem starter code is ready in the hello
folder.
Bonus: Meet Mr Hyde - Dr Jekyll’s Dark Side - New Static Website Wizard Command
Q: What’s mrh/mrhyde ★14 (github: mrhydescripts/mrhyde)?
Static website quick starter script wizard .:. the missing jekyll command line tool.
Try:
$ mrhyde help
To run a static website quick starter wizard script to download and install (unzip/unpack) a theme archive and configure a static website ready-to-use. Try:
$ mrhyde new starter    # or
$ mrhyde n starter      # or
$ mrh n starter
This will download the starter.rb wizard script
from the Mr. Hyde’s Scripts repo
and run through all steps.
Welcome, before setting up your site Mr. Hyde will ask you some questions.

Q: What's your site's title? [Your Site Title]:  Another Beautiful Static Website
Q: What's your name? [Henry Jekyll]: Edward Hyde
Q: Select your theme:
     1 - Starter
     2 - Bootstrap
     3 - Minimal
   Your choice (1-3)? [1]: 2

Thanks! Ready-to-go. Stand back twenty-five meters.
  Downloading Henry's Bootstrap Theme...
  Setting up Henry's Bootstrap Theme..
  ...
  Updating settings in _config.yml...
    title: "Another Beautiful Static Website"
    author.name: "Edward Hyde"
  ...
Done.
That’s it. Now use:
$ cd starter
$ jekyll serve
And open up your new static website in your browser.
2. hoe - Build, Package and Publish Gems with Hoe; Use Build Scripts with Ready-to-Use Rake Tasks
Automate, Automate, Automate
github: seattlerb/hoe, rubygems: hoe, rdoc: rdoc ++ more: comments on reddit, please!
What’s Hoe?
Hoe is a library that bundles ready-to-use rake tasks
to help you build, package and publish your own gems.
Thanks to Ryan Davis
and friends (from Seattle.rb)
for polishing the gem all those years - more than 100+ releases - leading to today’s version 3.16.
Let’s create a bare bones gem (hellohoe) and publish it on RubyGems.org.
Set up your gem by adding a build script, readme, change log and manifest
To use Hoe together with your own code use the following structure:
/hellohoe
  + README.txt        - Description in plain text
  + History.txt       - Version change log in plain text
  + Manifest.txt      - List of all files to include in plain text
  + Rakefile          - Build script (requires your name and email)
  + /lib
     + hellohoe.rb    - Ruby code to bundle up into gem here
Note: You can grab all files from this post from the hellohoe GitHub repo.
Let’s look at hellohoe.rb:
class HelloHoe
  VERSION = '0.1.0'

  # your code here
end
Hoe requires a VERSION string in your Ruby code that you can reference in your build script.
Let’s look at the build script, that is, Rakefile next:
require 'hoe'                # pull in the hoe machinery (that is, ready-to-use rake tasks)
require './lib/hellohoe.rb'

Hoe.spec 'hellohoe' do
  self.version = HelloHoe::VERSION

  self.author  = '[Your Name Here]'
  self.email   = '[Your Email Here]'

  # or use shortcut
  # self.developer( '[Your Name Here]', '[Your Email Here]' )
end
As a minimum Hoe requires you to set the author and email fields in the gemspec.
As a shortcut you can use the developer method to set it all at once.
Next Hoe requires a readme in plain text stored in README.txt:
= hellohoe

* https://github.com/planetruby/hellohoe

== DESCRIPTION:

Sample on how to use Hoe Rake tasks to build, package and publish gems.

== LICENSE:

The hellohoe sources are dedicated to the public domain.
Hoe will use the link from the first section, that is, github.com/geraldb/hellohoe
to auto-fill the homepage field in the gemspec and will use the description to
auto-fill the summary field and the description in the gemspec.
Next Hoe requires a version changelog in plain text stored in History.txt:
=== 0.1.0 / 2018-01-08

* Everything is new. First release.
Hoe will use the changelog to auto-fill the changes field in the gemspec
and use the changelog for emails and announcements.
Finally, Hoe requires a manifest - a list of all files to include in plain text stored in Manifest.txt:
History.txt
Manifest.txt
README.txt
Rakefile
lib/hellohoe.rb
Now you’re all set to use Hoe’s rake tasks to build, package and publish gems and more.
You can list all tasks by running rake -T. Resulting in:
rake announce              # publish   # Announce your release.
rake audit                 # test      # Run ZenTest against the package.
rake check_extra_deps      # deps      # Install missing dependencies.
rake check_manifest        # debug     # Verify the manifest.
rake clean                 # clean     # Clean up all the extras.
rake clobber_docs          # publish   # Remove RDoc files
rake clobber_package       # package   # Remove package products
rake config_hoe            # debug     # Create a fresh ~/.hoerc file.
rake dcov                  # publish   # Generate rdoc coverage report
rake debug_email           # publish   # Generate email announcement file.
rake debug_gem             # debug     # Show information about the gem.
rake default               # test      # Run the default task(s).
rake deps:email            # deps      # Print a contact list for gems dependent on this gem
rake deps:fetch            # deps      # Fetch all the dependent gems of this gem into tarballs
rake deps:list             # deps      # List all the dependent gems of this gem
rake docs                  # publish   # Generate rdoc
rake gem                   # package   # Build the gem file hellohoe-0.1.gem
rake generate_key          # signing   # Generate a key for signing your gems.
rake install_gem           # package   # Install the package as a gem.
rake install_plugins       # deps      # Install missing plugins.
rake newb                  # newb      # Install deps, generate docs, run tests/specs.
rake package               # package   # Build all the packages
rake post_blog             # publish   # Post announcement to blog.
rake publish_docs          # publish   # Publish RDoc to wherever you want.
rake release               # package   # Package and upload; Requires VERSION=x.y.z (optional PRE=a.1)
rake release_sanity        # package   # Sanity checks for release
rake release_to_gemcutter  # gemcutter # Push gem to gemcutter.
rake repackage             # package   # Force a rebuild of the package files
rake ridocs                # publish   # Generate ri locally for testing.
Using debug_gem, gem, package, install_gem tasks
Let’s try some Hoe tasks. Run rake debug_gem to show the gemspec Hoe generates
from your build script settings, readme, change log and manifest.
Next, let’s build the gem. Run rake gem. Resulting in:
mkdir -p pkg
  Successfully built RubyGem
  Name: hellohoe
  Version: 0.1.0
  File: hellohoe-0.1.0.gem
mv hellohoe-0.1.0.gem pkg/hellohoe-0.1.0.gem
Hoe will place your gem in the pkg folder. If you run rake package Hoe
will bundle up all your sources in a tar’ed and gzipped package
(e.g. pkg/hellohoe-0.1.0.tgz).
Next, let’s test drive the gem. Run rake install_gem to install
the gem and try it in the Ruby console:
$ irb
>> require 'hellohoe'
=> true
>> HelloHoe::VERSION
=> "0.1.0"
Checking and updating your manifest with check_manifest
Hoe includes a check_manifest task
that lets you check the manifest against your files and see
if any files are missing or need to get added.
If you run the task the first time you need to create a ~/.hoerc setting file
first that includes a regex (regular expression) pattern that excludes files
from the manifest check. To create a new ~/.hoerc file run rake config_hoe.
Resulting in a file such as:
---
exclude: !ruby/regexp /tmp$|CVS|TAGS|\.(svn|git|DS_Store)/
signing_key_file: ~/.gem/gem-private_key.pem
signing_cert_file: ~/.gem/gem-public_cert.pem
publish_on_announce: true
blogs:
- user: user
  password: password
  url: url
  blog_id: blog_id
  extra_headers:
    mt_convert_breaks: markdown
Now let’s try rake check_manifest. If everything is in order (no files missing or waiting to get added).
You will see:
rm -r doc
rm -r pkg
rm Manifest.tmp
Let’s create a new Todo.txt file and let’s retry rake check_manifest.
Now you will see a diff:
@@ -2,4 +2,5 @@
 Manifest.txt
 README.txt
 Rakefile
+Todo.txt
 lib/hellohoe.rb
Using the release task to upload (push) your gem to RubyGems.org
Next, let’s upload (push) the gem to RubyGems.org using the release task.
Before you can upload to RubyGems.org you will need to setup an account and save your RubyGems.org API key on your computer. Issue the command to store your RubyGems.org API key on your computer (only needed the first time):
$ curl -u carlos https://rubygems.org/api/v1/api_key.yaml > ~/.gem/credentials
Now you’re ready to use hoe to upload (push) your gem to RubyGems.org
without requiring to enter a user and password.
Run the command rake release and pass along the required release version. Example:
$ rake release VERSION=0.1.0
Check your RubyGems.org project page (e.g. rubygems.org/gems/hellohoe) if it all worked.
Note, that it will take a minute or more until your uploaded gem gets added to the public RubyGems index.
You can check if your gem is available using the list command with the -r (remote) switch.
Example:
$ gem list hellohoe -r

*** REMOTE GEMS ***

hellohoe (0.1.0)
That’s it.
Bonus Tip by Ryan Davis: Quick Starter Templates with sow
Ryan Davis writes: The easiest way to get started with hoe is to use its included command-line tool sow:
$ sow hellohoe
That will create a new directory hellohoe with a skeletal project inside. You need to edit the
Rakefile with developer information in order to meet the minimum requirements of a working gemspec.
You should also go fix all the things it points out as being labeled with FIX in the README.txt file.
(Source: Hoe PDF Booklet; 6 Pages)
3. schemadoc - Auto-generate your SQL database schema documentation for tables, columns, symbols A-Z, etc
Connects with ActiveRecord works with SQLite, PostgreSQL, MySQL, MariaDB, …
github: schemadoc/schemadoc, rubygems: schemadoc, rdoc: schemadoc ++ more: comments on reddit, please!
What’s schemadoc?
The schemadoc library includes a ready-to-use command line tool named - surprise, surprise - schemadoc that lets you auto-generate your database schema documentation for tables, columns, and more.
Try:
$ schemadoc --help
resulting in:
schemadoc 1.0.0 - Lets you document your database tables, columns, etc.

Usage: schemadoc [options]
    -o, --output PATH            Output path (default is '.')
    -v, --verbose                Show debug trace

Examples:
  schemadoc                # defaults to ./schemadoc.yml
  schemadoc football.yml
Overview. The schemadoc tool connects to your database (e.g. SQLite, PostgreSQL, etc.)
and writes out the schema info in database.json
{
  "schemas": [
    {
      "name": "football",
      "tables": [
        {
          "name": "alltime_standing_entries",
          "columns": [
            {
              "name": "id",
              "type": "integer",
              "default": null,
              "null": false
            },
            {
              "name": "alltime_standing_id",
              "type": "integer",
              "default": null,
              "null": false
            },
            {
              "name": "team_id",
              "type": "integer",
              "default": null,
              "null": false
            },
...
and also builds an A-Z symbols index stored in symbols.json.
{
    "name": "A",
    "tables": [
      "alltime_standing_entries",
      "alltime_standings",
      "assocs",
      "assocs_assocs"
    ],
    "columns": [
      {
        "name": "abbr",
        "tables": [
          "regions"
        ]
      },
      {
        "name": "address",
        "tables": [
          "grounds",
          "teams"
        ]
      },
...
Drop the JSON documents in the _data/ folder for your static
site theme (template pack) and let Jekyll (or GitHub Pages) do the rest.
Examples in the real world. See the football.db or beer.db for live examples.
Getting Started w/ schemadoc
Let’s document the football.db SQLite version in three steps:
- Step 1: Let’s create the football.db
- Step 2: Let’s write out the schema info in JSON
- Step 3: Let’s generate a static schema documentation site
Step 1: Let’s create the football.db
First let’s create the football.db itself. Pull in the sportdb-models library
and use the built-in “auto-migrate” method SportDb.create_all that will create all database tables.
Example:
mkfootball.rb:
require 'logger'
require 'sportdb/models'      # use $ gem install sportdb-models

DB_CONFIG = {
  adapter: 'sqlite3',
  database: './football.db'
}

ActiveRecord::Base.logger = Logger.new( STDOUT )
ActiveRecord::Base.establish_connection( DB_CONFIG )

SportDb.create_all

puts 'Done.'
Run the script:
$ ruby ./makfootball.rb
Now you’ve got an empty football.db with many many tables. Let’s document the database schema(ta).
Step 2: Let’s write out the schema info in JSON
The schemadoc command line tool requires a configuration file, that is, /schemadoc.yml
that lists the connection settings and the schemas (such as football, world, and the works.) Example:
schemadoc.yml:
## connection spec

database:
  adapter:  sqlite3
  database: ./football.db


## main tables

football:
  name: Football

## world tables

world:
  name: World
  tables:
    - continents
    - countries
    - regions
    - cities
    - places
    - names
    - langs
    - usages

## works tables

works:
  name: The Works
  tables:
     - logs
     - props
     - tags
     - taggings
Now run the schemadoc tool:
$ schemadoc
and you will end-up with two JSON files, that is, database.json and symbols.json.
Step 3: Let’s generate a static schema documentation site
Get a copy of the schemadoc/schemadoc-theme static website theme
and drop (copy) the two JSON files, that is, database.json and symbols.json
into the _data/ folder. Change the site settings in _config.yml and run:
$ jekyll build
That’s it. Open up in your browser the ./_site/index.html page.
Enjoy your databasse schema documentation.
4. annotate - Annotate Your ActiveRecord Models with Comments about Your Database Table Structure
github: ctran/annotate_models, rubygems: annotate, rdoc: annotate ++ more: comments on reddit, please!
Magic. ActiveRecord models can be as simple as:
class Beer < ActiveRecord::Base
end
or
class Brewery < ActiveRecord::Base
end
Some may find that’s a little too much magic. Where’s the code? What attribute can you use?
By default ActiveRecord models require no information on the database tables wrapped
(it all works - thanks to convention over configuration, that is,
the class Beer (singular noun), for example, gets mapped to the table beers (plural noun)
and Brewery to breweries and so on.
Best of both worlds. Less code is great and it’s easy to update the model - just update the table - there are no out-of-date setter and getters duplicated in the model, for example. If you want the best of both worlds - you can always add the table columns to your models as comments. Example:
# == Schema Information
#
# Table name: beers
#
#  id         :integer          not null, primary key
#  key        :string(255)      not null
#  title      :string(255)      not null
#  synonyms   :string(255)
#  web        :string(255)
#  since      :integer
#  seasonal   :boolean          default(FALSE), not null
#  limited    :boolean          default(FALSE), not null
#  kcal       :decimal
#  abv        :decimal
#  og         :decimal
#  srm        :integer
#  ibu        :integer
#  brewery_id :integer
#  brand_id   :integer
#  grade      :integer          default(4), not null
#  txt        :string(255)
#  txt_auto   :boolean          default(FALSE), not null
#  country_id :integer          not null
#  region_id  :integer
#  city_id    :integer
#  created_at :datetime
#  updated_at :datetime
#

class Beer < ActiveRecord::Base
end
or
# == Schema Information
#
# Table name: breweries
#
#  id          :integer          not null, primary key
#  key         :string(255)      not null
#  title       :string(255)      not null
#  synonyms    :string(255)
#  address     :string(255)
#  since       :integer
#  closed      :integer
#  brewpub     :boolean          default(FALSE), not null
#  web         :string(255)
#  wikipedia   :string(255)
#  country_id  :integer          not null
#  region_id   :integer
#  city_id     :integer
#  created_at  :datetime
#  updated_at  :datetime
#

class Brewery < ActiveRecord::Base
end
That looks like a lot of work if you type it in by hand. If all the schema information is already stored in the database - why not automate the annotation procedure with a script in Ruby?
What’s the annotate library?
Let’s thank Dave Thomas
and friends
who created the first annotate-models script back in 2006 as a Rails plugin
and let’s thank Cuong Tran
,
Alex Chaffee
and friends
who continue the tradition with a modern up-to-date annotate library
with more than 20+ releases since 2009 and 5+ million downloads.
Not just for Rails. Out-of-the-box the annotate library includes a command line tool named - surprise, surprise - annotate. Let’s try it:
$ annotate -h
Will result in:
Please run annotate from the root of the project.
The annotate tool requires a Rakefile or Gemfile in the current working folder. Let’s create an empty Rakefile. Example:
Rakefile:
# beer.db Models Annotate Example
Now try:
$ annotate -h
Will result in:
Usage: annotate [options] [model_file]*
    -d, --delete                     Remove annotations from all model files or the routes.rb file
    -p, --position [before|after]    Place the annotations at the top (before) or the bottom (after) of the model/test/fixture/factory/routes file(s)
        --pc, --position-in-class [before|after]
                                     Place the annotations at the top (before) or the bottom (after) of the model file
        --pf, --position-in-factory [before|after]
                                     Place the annotations at the top (before) or the bottom (after) of any factory files
        --px, --position-in-fixture [before|after]
                                     Place the annotations at the top (before) or the bottom (after) of any fixture files
        --pt, --position-in-test [before|after]
                                     Place the annotations at the top (before) or the bottom (after) of any test files
        --pr, --position-in-routes [before|after]
                                     Place the annotations at the top (before) or the bottom (after) of the routes.rb file
    -r, --routes                     Annotate routes.rb with the output of 'rake routes'
    -v, --version                    Show the current version of this gem
    -m, --show-migration             Include the migration version number in the annotation
    -i, --show-indexes               List the table's database indexes in the annotation
    -s, --simple-indexes             Concat the column's related indexes in the annotation
        --model-dir dir              Annotate model files stored in dir rather than app/models
        --ignore-model-subdirects    Ignore subdirectories of the models directory
        --sort                       Sort columns alphabetically, rather than in creation order
    -R, --require path               Additional file to require before loading models, may be used multiple times
    -e [tests,fixtures,factories],   Do not annotate fixtures, test files, and/or factories
        --exclude
    -f [bare|rdoc|markdown],         Render Schema Infomation as plain/RDoc/Markdown
        --format
        --force                      Force new annotations even if there are no changes.
        --timestamp                  Include timestamp in (routes) annotation
        --trace                      If unable to annotate a file, print the full stack trace, not just the exception message.
    -I, --ignore-columns REGEX       don't annotate columns that match a given REGEX (i.e., `annotate -I '^(id|updated_at|created_at)'`
Looking good. Let’s try to annotate the standalone beer.db models, that is, Beer, Brand, and Brewery.
Create a new /lib folder and add:
beer.rb:
class Beer < ActiveRecord::Base
end
brand.rb:
class Brand < ActiveRecord::Base
end
brewery.rb:
class Brewery < ActiveRecord::Base
end
And to wrap-up add the required setup code for an in-memory SQLite datebase to the empty Rakefile:
Rakefile:
# beer.db Models Annotate Example

def setup_in_memory_db
  require 'beerdb'

  ActiveRecord::Base.establish_connection(
      adapter:  'sqlite3',
      database: ':memory:'
  )

  BeerDb.create_all
end


setup_in_memory_db()
That’s it. Get ready to annotate the models. Try:
$ annotate --model-dir lib
Resulting in:
Annotated (3): Beer, Brand, Brewery
Open up the beer.rb, brand.rb or brewery.rb scripts and Voila!
All the table schema information is now included.
To update the table schema information simply rerun annotate.
5. erd - Generate entity-relationship diagrams (ERD) for your activerecord models
github: [voormedia/rails-erd](https://github.com/voormedia/rails-erd, rubygems: rails-erd, rdoc: rails-erd
Let’s say you have defined your database schema (tables) with ActiveRecord in Ruby. Example:
create_table :breweries do |t|
  t.string  :key,    null: false
  t.string  :title,  null: false
  t.string  :address
  t.string  :web
end

create_table :beers do |t|
  t.references :brewery
  t.string  :key,     null: false
  t.string  :title,   null: false
  t.text    :comments
end
And your models with classes in Ruby and assocations with class macros such as
belongs_to, has_many, and so on:
class Beer < ActiveRecord::Base
  belongs_to :brewery
end

class Brewery < ActiveRecord::Base
  has_many   :beers
end
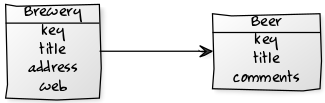
How can you auto-generate an entity-relationship diagram? For example:
The good news. The ActiveRecord machinery already has everything built-in for a minimal (quick ‘n’ dirty) do-it-yourself version.
Step 1: “Discover” all models
Use ActiveRecord::Base.descendants that
gets you an array with all loaded (known) models at runtime
to find (discover) all models of your app. Example:
models = ActiveRecord::Base.descendants

puts " #{model.size} models:"

models.each do |model|
  puts "  #{model.name}"
end
Will print for our simple example schema:
 2 models:
     Beer
     Brewery
Step 2: Get all “meta” info - all column definitions and associations
Now lets print out all columns with its name and SQL type
plus all associations (defined with the “classic” belongs_to, has_many, etc. macros):
models.each do |model|
  puts "#{model.name}"
  puts '  columns:'
  model.columns.each do |column|
    puts "    #{column.name} #{column.sql_type}"
  end

  puts '  assocs:'
  model.reflect_on_all_associations.each do |assoc|
    puts "    #{assoc.macro} #{assoc.name}"
  end
end
Results in:
Beer
  columns:
    id         integer
    brewery_id integer
    key        varchar(255)
    title      varchar(255)
    comments   text
  assocs:
    belongs_to brewery
Brewery
  columns:
    id         integer
    key        varchar(255)
    title      varchar(255)
    address    varchar(255)
    web        varchar(255)
  assocs:
    has_many beers
Step 3: Turn the text describing your models and assocations into a diagram
Now all that’s left is turning the text into a diagram. Again the good news - tools and services
abound - let’s start with the yuml.me service. Use:
[note: A simple beer.db diagram with yuml.me  {bg:wheat}]

[Brewery|key;title;address;web] -> [Beer|key;title;comments]
that gets turned into:

Now why not find a gem that alreay has all the code packed up for easy (re)use with more examples and a getting started guide and much more?
What’s the rails-erd gem?
Let’s thank Rolf Timmermans, Kerri Miller, and friends who have created the rails-erd gem that
lets you easily auto-generate
entity-relationship diagrams (ERD) from your ActiveRecord models.
Not just for Rails. Although the gem includes rails in its name
it works great with “plain vanilla” ActiveRecord models without
requiring the Rails machinery.
Let’s try it using the beer.db ActiveRecord models and schema
bundled-up for easy (re)use in the beerdb-models gem.
require 'beerdb/models'            # use $ gem install beerdb

## Let's create an in-memory SQLite database

DB_CONFIG = {
  adapter: 'sqlite3',
  database: ':memory:'
}

ActiveRecord::Base.establish_connection( DB_CONFIG )

BeerDb.create_all   ## create tables (e.g. breweries, beers, etc.)

## Now hand over to rails-erd

require 'rails_erd/diagram'

class YumlDiagram < RailsERD::Diagram

  setup do
    @edges = []
  end

  each_relationship do |relationship|
    line = if relationship.indirect? then "-.-" else "-" end

    arrow = case
    when relationship.one_to_one?   then "1#{line}1>"
    when relationship.one_to_many?  then "1#{line}*>"
    when relationship.many_to_many? then "*#{line}*>"
    end

    @edges << "[#{relationship.source}] #{arrow} [#{relationship.destination}]"
  end

  save do
    puts @edges.join("\n")
  end
end

YumlDiagram.create
will result in (simplified):
[Country] 1-*> [State]
[State] 1-*> [City]
[City] 1-*> [Brewery]
[Brewery] 1-*> [Beer]
[Brewery] 1-*> [Brand]
[Brand] 1-*> [Beer]
And turned into a diagram:

Note: Instead of using the all-in-one YumlDiagram.create convenience method
you can walk through step-by-step. Example:
## Get all meta-info

domain  = RailsERD::Domain.generate

pp domain.entities        ## dump all entities (models)
pp domain.relationships   ## dump all relationships (assocs)

## Generate diagram

diagram = YumlDiagram.new( domain )

diagram.generate   ## step 1 - generate
diagram.save       ## step 2 - save
What’s Graphviz and the DOT language?
Note, by default the rails-erd uses the Graphviz class
to build your diagrams using the graphviz machinery (and its DOT language).
Graphviz (short for Graph Visualization Software) is a free open source package by AT&T Labs Research for drawing graphs specified in DOT language scripts started more than fifteen years ago. Example:
digraph example
{
  Brewery [shape=box, style=filled, color=blue]
  Beer [shape=box, color=navy]

  Country -> State -> City -> Brewery
  Brewery -> Beer
  Brewery -> Brand
  Brand   -> Beer
}
Change the YumlDiagram.create method to RailsERD::Diagram::Graphviz.create
and you will get a GraphViz-generated diagram as a PDF document, PNG pixel graphic,
SVG vector graphic or whatever filetype you desire.
That’s it.
